


Author’s Note: Microsoft has officially announced the retirement of Exchange Web Services (EWS) for Exchange Online, with the service being fully disabled on October 1, 2026. This change has important implications for organizations that rely on third-party applications accessing Public Folder data, especially contacts and calendars. You can read more about this in our recent blog.
Read the instructions or check out the video to learn how to create and share Public Folders with Outlook Desktop:
watch this video
How to Create and Share Public Folder Contacts
Outlook
Outlook
How To Create and Share Public Folder Contact Lists with Outlook Desktop
Creating the Public Folder Contact List
- Log in to Outlook Desktop.
- Click the ellipsis at the bottom of the left-hand navigation panel.
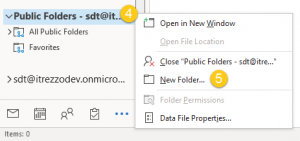
- Click Folder to go to the Outlook Folder View. (See figure below.)

- Right-click Public Folders.
- Click New Folder. (See figure below.) NOTE: You need to be the Owner or the Publishing Editor/Author of the parent Public Folder to create new subfolders.

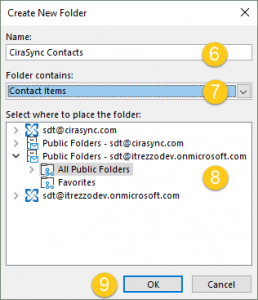
- Name the new folder. In this example, the new folder is called CiraSync Contacts.
- Select Contact Items in the drop-down menu under Folder Contains.
- Select where to place the folder. In this example, the folder will be placed in All Public Folders.
- Click OK. (See figure below.)

- Double-click the new subfolder in the left-hand navigation panel.
- Click New Contact at the top-left corner of the window to start adding contacts to this newly created list.

Content goes here
Sharing the Public Folder Contact List
NOTE: You can only share a Public Folder Contact List to a mail-enabled account.
- Right-click on the contact list you created in the Creating the Contact List section of this guide.
- Click Properties.
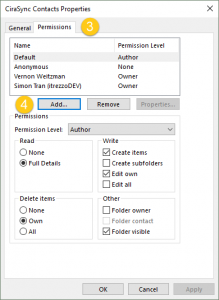
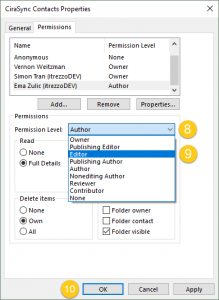
- Go to the Permissions tab.
- Click Add. (See figure below.)

- Search for the user(s)/user group(s) you want to share the contact list to.
- Double-click the name to add the user.
- Click OK. (See figure below.)

- Click the drop-down arrow in Permission Level.
- Choose the permission level to assign to the added user. In this example, the Editor permission level is assigned.
- Click OK to share your calendar. (See figure below.)


Public Folders are also a great Contact Management Tool when used with CiraSync. Learn more about CiraSync’s capabilities as a productivity enhancement software with this FAQ.


