


After performing your first Contact or Calendar sync, you may want to secure, restrict, or expand user access to the Dashboard in CiraSync Enterprise Edition. This guide shows how to set up roles-based administration for CiraSync users.
Instructions
- Log in to the CiraSync Enterprise Edition Dashboard.
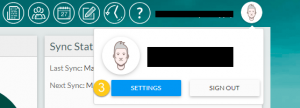
- Click the username at the top-right corner of the Dashboard.
- Click SETTINGS. (See figure below.)
- Click Manage Roles.
- Click on the User or Group you want to edit. A list of role permissions should appear on the right side of the Dashboard. Below is a list of role permissions and their descriptions:
-
- Full Administrator: Complete CiraSync functionality.
- Dashboard View Only: View the CiraSync Dashboard.
- Contact List Manager: Create, update, and delete Contact Lists.
- Collection Manager: Create, update, and delete Contact Collections.
- Billing Administrator: View Dashboard licenses, request sales Quotes, and buy licenses.
-
- Uncheck the boxes to revoke permissions from the User or Group. CiraSync will automatically save these changes. NOTE: You can re-add these permissions by checking these boxes.

