Author’s Note: Microsoft has officially announced the retirement of Exchange Web Services (EWS) for Exchange Online, with the service being fully disabled on October 1, 2026. This change has important implications for organizations that rely on third-party applications accessing Public Folder data, especially contacts and calendars. You can read more about this in our recent blog.
Read the instructions or check out the video to learn how to create and share Public Folders with Office 365:
watch this video
How to Create and Share Public Folder Contacts
Office 365
Office 365
Instructions
Creating a Public Folder
- Launch the Office 365 Admin Portal.
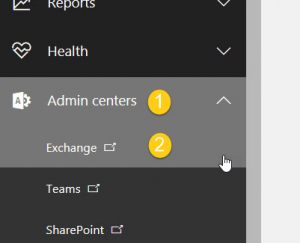
- Click Admin centers > Exchange in the navigation panel to be taken to the Exchange Admin Center. (See figure below.)

- Click public folders in the navigation panel.
- Click the + to create a new Public Folder. (See figure below.) NOTE: You will need to be Owner or the Publishing Editor/Author of the parent folder to create new subfolders.

- Name the new Public Folder.
- Click SAVE.

Content goes here
Sharing a Public Folder
- Double-click the Public Folder you created in the previous section.
- Click the ellipsis.
- Click Root permissions. (See figure below.)
 The Public Folder Root Permissions Window will appear. (See figure below.)
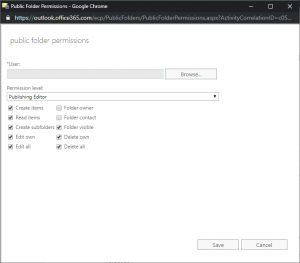
- Click the +. The Public Folder Permissions Window will appear. (See figure below.)
- Click Browse.
- Choose the desired recipient of the Public Folder.
- Click OK.
- Click the drop-down arrow to pull up the list of roles permissions that are available, and then select the desired role.
- Click SAVE. You will return to the Root Permissions Window.
- Click SAVE.
 The Public Folder Root Permissions Window will appear. (See figure below.)
You can use Outlook or the CiraSync mobile app to add items into the Public Folders that were just created. To learn how, check out the following procedures: