
Update 2024
CiraApps has streamlined the process of synchronizing Global Address Lists (GALs) across multiple tenants. Users can now perform this sync seamlessly with CiraHub.
Sync Multiple Global Address Lists with CiraHub (Preferred Method)
How CiraHub’s Multi-Way GAL Sync Works
Prerequisites for Two-Way GAL Sync on CiraHub
To perform a multi-way GAL sync on CiraHub, ensure that you have the following:
- Access to the CiraHub dashboard via a paid license or free trial
- Administrative rights to your organization(s) Microsoft 365 GAL
Basic Steps For Multi-Way GAL Sync
Syncing GAL to GAL with CiraHub is a straightforward process:
- Create a Microsoft 365 GAL Spoke: On the CiraHub dashboard, create a Spoke for your first Microsoft 365 GAL. Securely log in to your GAL account and connect it to CiraHub. This step will involve authenticating your organization’s contact repository, such as Admin Exchange or Office 365 accounts.
- Add Another Spoke: You’ll need to create an additional Spoke for another GAL and establish the connection with the Hub.
- Initiate GAL-to-GAL Sync: On the CiraHub dashboard, select “Sync Now” to begin synchronizing contacts between the two GALs, enabling bi-directional data flow. This process will ensure that any changes in the GAL are promptly reflected in the second tool and vice-versa.
Alternative: Multi-Way GAL Sync With CiraSync
This guide shows how to use CiraSync Enterprise Edition to sync the Global Address List (GAL) between two Office 365 tenants.
If you are an on-premise Exchange user, learn how to share contacts between two Exchange organizations on itrezzo!
Before You Start
This guide assumes that a dedicated service account with Impersonation Mode has been set for the CiraSync tenants involved with this procedure. Without an administrator account with Application Impersonation, CiraSync will be unable to push contact and calendar updates to user mailboxes. Check out the following articles to learn how to set up a dedicated service account with the appropriate permissions for all of your tenants and then return here to learn how to sync the GAL between multiple tenants with CiraSync Enterprise Edition:
- Setting up a Dedicated Service Account for CiraSync in Office 365
- Setting Impersonation Mode to Sync to User Mailboxes
- Making CiraSync Use a Specific Office 365 Service Account
Instructions
Creating a User Mailbox
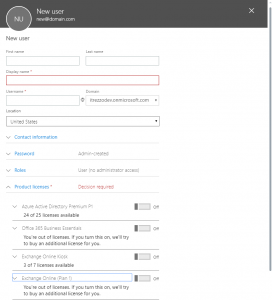
- Launch the Office 365 Admin Portal of Tenant A.
- Click Users > Active Users in the left navigation panel.
- Click +Add a user at the top of the page. The Add new user panel will appear on the screen. (See figure below.)

- Provide a name for this mailbox.
- Click Password > Let me create the password.
- Create a strong password for the user mailbox.
- Uncheck the Make this user change their password when they first sign in box.
- Click the slider next to an Exchange Online Plan to assign a Microsoft Exchange License to the mailbox. NOTE: The licenses can be any of the following plans in Office 365: Kiosk for $2.00 per month or Microsoft F1/Plan 1 for $4.00 per month.
- Click Add at the bottom of the panel.
Syncing the Global Address List to the New User Mailbox
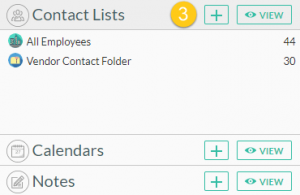
- Log in to the CiraSync home dashboard of Tenant A.
- Click + in the Contact List pane.
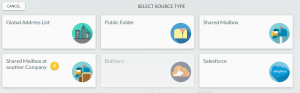
- Select the Global Address List as the Contact Source Type.
- Follow the wizard to create a sync configuration. NOTE: The source will be contacts of the Tenant A GAL, which can be All Mailboxes and/or All Users, a Contact Collection, or a Dynamic Distribution List. The target will be the user mailbox created in Creating a User Mailbox section of this guide.
- Perform a manual sync with the Update Cache box checked.
Syncing the Tenant A Global Address List to Tenant B
- Log in to the CiraSync home dashboard of Tenant B.
- Click the + in the Contact Lists pane. (See figure below.)

- Select Shared Mailbox at another Company as the contact source type. (See figure below.)

- Type in the user mailbox that was created in the Creating a User Mailbox section of this guide.
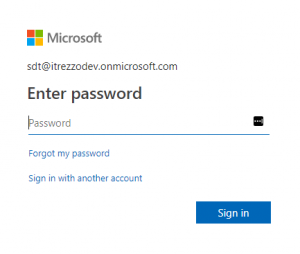
- Click SIGN IN. (See figure below.)

- You will be taken to the Office 365 sign-in page. (See figure below.)

- Type in the password of the user mailbox.
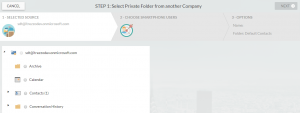
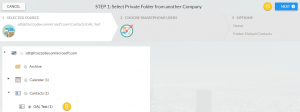
- Click Sign in. You will be taken to STEP 1: Select Private Folder from another Company. (See figure below.)

- Select the Contacts List created from the sync performed in the Syncing the Global Address List to the New User Mailbox section of this guide.
- Click NEXT. (See figure below.)
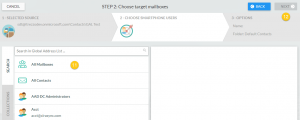
 You will be taken to STEP 2: Choose target mailboxes. (See figure below.)
- Select All Mailboxes to sync Tenant A’s GAL to your users.
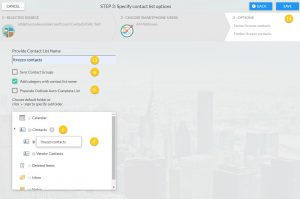
- Click NEXT. (See figure below.) You will be taken to STEP 3: Specify contact list options. (See figure below.)

- Name the contact list you are about to create in the box under Provide Contact List Name. The contact list name will be added as a category for each contact synced by CiraSync.
- Check Sync Contact Groups if you have groups in the contact list and would like to sync members of that group. You may skip to the following step if this is not the case.
- Check Populate Outlook Auto-Complete List if you want these sync contacts appear in the Outlook Auto-Complete list. You may skip to the following step if this is not the case.
- Click the + next to Contacts, and then name the subfolder to sync to a subfolder. If you would like to sync these contacts to your main Contacts folder, then skip to Step 14.
- Click SAVE. (See figure below.)
 You will be taken to the sync summary dashboard. (See figure below.)
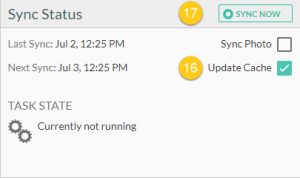
- Click the blue back arrow to return to the CiraSync tenant dashboard.
- Check the Update Cache box under the Sync Status pane at the top-right corner of the dashboard.
- Click SYNC NOW to run a manual sync. (See figure below.)


 You will be taken to STEP 2: Choose target mailboxes. (See figure below.)
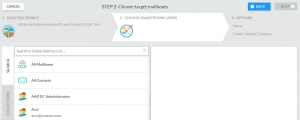
 You will be taken to STEP 3: Specify contact list options. (See figure below.)
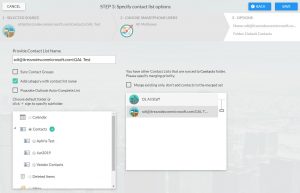
 You will be taken to the sync summary dashboard. (See figure below.)
An there you go! We just synced the Global Address List between two tenants!
To directly sync the two GALs without having to create an empty mailbox, check out our new product, CiraHub!

