Want to share an Outlook calendar with your coworkers, friends, and family?
You can inform other people about your schedule by giving them access to your Outlook calendar or by sending a snapshot of your calendar.
In fact, sharing a calendar is one of the best Outlook calendar tips.
Let’s break down how to share an Outlook Calendar on your Desktop computer.
TL;DR – How to Share an Outlook Calendar (All Platforms)
- Windows Desktop: Open Outlook → Click the Calendar icon in the bottom-left → Select the calendar → Right-click → Properties → Permissions tab → Click Add → Enter the person’s email → Set permission level → Click OK.
- Outlook Web: Go to Calendar → Right-click the calendar under My calendars → Sharing and permissions → Enter email → Select permission level from dropdown → Click Share.
- Mac: Open Outlook → Click Calendar icon → Right-click the calendar → Sharing Permissions → Click + → Enter email(s) → Set permission level → Click Add.
- iPhone/Android: Open Outlook app → Tap calendar menu (top left) → Tap gear icon → Add People → Select contact → Edit permissions → Tap checkmark.
- Permission Levels:
- Can view when I’m busy
- Can view titles and locations
- Can view all details
- Can edit (desktop only)
Troubleshooting: If sharing fails, check for duplicate entries in the calendar’s Permissions list (Properties → Permissions tab) and remove duplicates.
Key Takeaways:
- To share an Outlook calendar on Windows, go to Calendar > Share > Enter the person’s name or email address.
- to share an Outlook calendar in Outlook web, go to My Calendar > Right-click on the calendar you want to share > Select Sharing and Permissions > Enter email address > Select the level of permission > Share.
- To share an Outlook calendar on Mac, go to Calendar > Right-click on the selected calendar > Choose sharing permissions > Enter the name or email address(es) > Click “Add.”
How to Share an Outlook Calendar on Windows
Sharing a calendar is fairly easy if you use Microsoft Outlook for Windows. Here are the steps.
1. Open and log in to Microsoft Outlook in your browser.
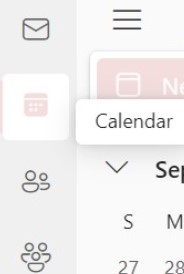
2. Click the calendar icon in the far left pane.
3. Click Share in the upper right corner of your screen.
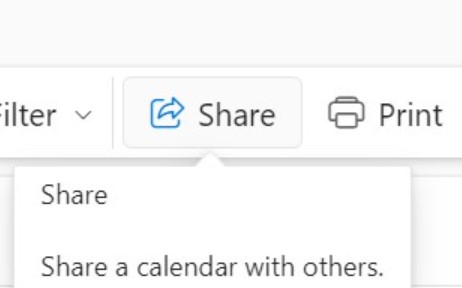
4. Enter the person’s name or email address in the text field.
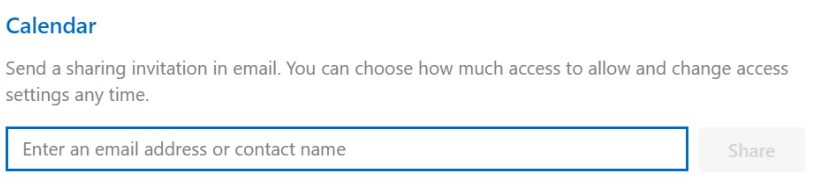
5. Select Share once your preferences are selected, or click the trash can icon if you’ve changed your mind.
Recommended reading: How to Create a Shared Calendar in Outlook?
How to Share an Outlook Calendar in Outlook Web
You can also Share an Outlook Calendar in Outlook Web. Here’s how.
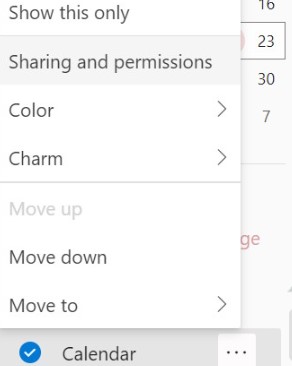
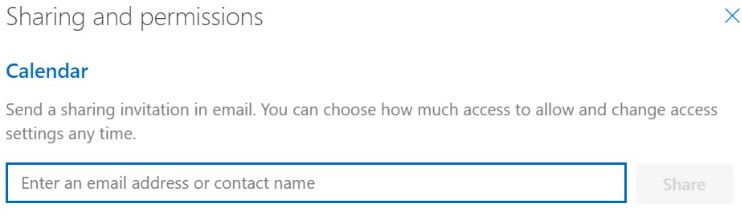
1. In Calendar, right-click on the calendar you want to share beneath ‘My calendars’ (e.g., Calendar). Select Sharing and Permissions.
2. A Sharing and permissions window will appear. Enter the name or email address of the individual within the provided search field.
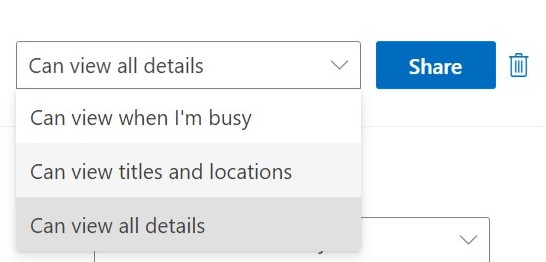
3. Select the level of permission you would like set from the provided drop-down list.
4. Select Share. An email notification will be sent to the individual confirming these changes have been applied.
Recommended reading: How to Open a Shared Calendar in Outlook Web?
How to Share an Outlook Calendar on Mac
Whether you need to coordinate meetings, plan events, or simply keep others informed about your availability, Outlook’s Mac app provides a simple way to share your calendar.
Below are the steps:
- Launch the Microsoft Outlook application on your Mac.
- Click on the “Calendar” icon in the bottom-left corner of the Outlook window to switch to the Calendar view.
- In the left sidebar, locate and click on the calendar you wish to share.
- Right-click on the selected calendar and choose “Sharing Permissions” from the context menu.
- Click the + button and enter the name or email address(es) of the people that you want to share your calendar with (separated by commas for multiple people). You can set permission levels for recipients (e.g., “Can view all details,” “Can edit,” etc.).
- Click “Add” to send the calendar sharing invitation.
Share Your Outlook Calendar on Android
Through the Outlook mobile app on your iPhone or Android smartphone, you may also share your Outlook calendar. Here are the steps outlined by Microsoft’s support blog:
1. Tap the calendar menu in the upper left.
2. Tap the Calendar gear icon.
![]()
3. Tap Add People and select the people you want to add.
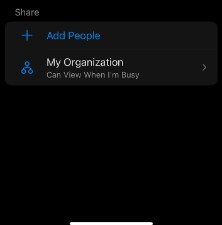
4. Select a person to modify their calendar permissions.
5. Tap the checkmark.
Recommended reading: How to Create an Outlook Calendar Group?
Share Your Outlook Calendar on iPhone
The steps below will show you how to share an Outlook calendar on an iPhone.
1. Open the Outlook app on your phone.
2. Tap the calendar menu.
3. Tap the gear icon.
![]()
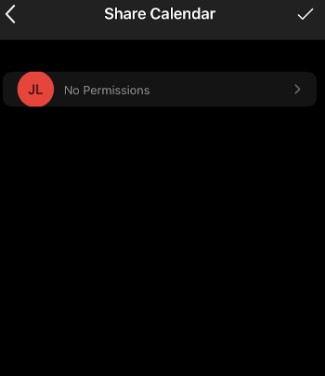
4. Choose Add People and select who you want to add.
5. Edit permissions by tapping the person you want to share the calendar with.
6. Tap the check mark.
Why Can’t I Share My Outlook Calendar With Someone?
You may not be able to share your Outlook calendar with someone because the email address you provided is invalid. That’s why you see the “This calendar can’t be shared with one or more of the people…” error.
However, if the email address is correct, the error might be with the duplicate entry in the Permissions list for your calendar.
To check for duplicate entries in Outlook:
1. Click the calendar icon for the user and click Properties.
2. Select the Tab for Permissions.
3. Look over the user list to see if any entries are duplicates.
Delete the duplicate entry if you find one. Restart Outlook afterward, and then try sharing your calendar to see whether it works.
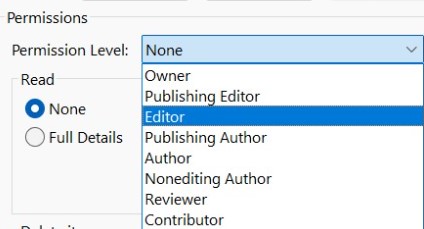
Outlook Calendar Sharing Permissions
You can choose how much access a user has to your Calendar or Folder when setting up permissions. Microsoft has predetermined permissions, however, they may be changed.
1. Click Calendar Icon in the lower left corner

2. In the left sidebar, right-click the calendar you want to share, then click Properties.
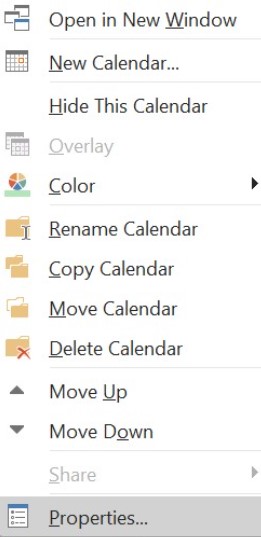
3. Click the Permissions tab
4. Click Add to add permissions for a new user, or click the name of the existing user in the list to change their current permissions.
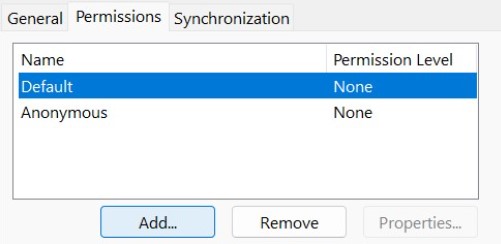
5. Either select a predefined set of permissions from the Permissions Level pull-down or specify the permission in the checkboxes below.
How Can I See Who Has Access to My Outlook Calendar?
To see who has access to your Outlook calendar, go to the Permissions tab on the Calendar Properties window. You’ll see a complete list of the people you’ve shared your calendar with and their access levels.
Right-clicking the calendar you want to look at will also bring up the Calendar Properties pane.
Check Which Outlook You Are Using?
Microsoft currently offers two versions of Outlook for Windows, and the steps to share your calendar differ slightly between them.
The Classic Outlook
This is the traditional desktop application that has been around for years. It has a blue title bar, a full ribbon menu at the top, and a bottom-left navigation pane with Mail, Calendar, People, and Tasks icons. If you open Calendar and see “Properties” when you right-click a calendar, you’re using Classic Outlook.
The New Outlook
This is a modern, web-based version of Outlook packaged as a desktop app. It has a cleaner, simplified left sidebar and a toggle in the top-right corner that says “Try the new Outlook” (or “Return to classic Outlook” if you’re already in the new version). The interface looks nearly identical to Outlook on the web. If you right-click a calendar and see “Sharing and permissions” instead of “Properties,” you’re using the New Outlook.
How to Check
Look at the top-right corner of your Outlook window:
If you see a toggle labeled “Try the new Outlook” → You are in Classic Outlook.
If you see a toggle labeled “Return to classic Outlook” → You are in the New Outlook.
Why This Matters
If you are using the New Outlook, follow the Outlook Web steps outlined above — the interface and menu options are the same. If you are using Classic Outlook, follow the Windows Desktop steps using the Properties > Permissions path.
To Recap
Learning how to share your Outlook calendar is one of the best ways to make it easier for others to stay on top of your schedule. Online calendars are incredibly useful for a variety of tasks, such as organizing a call or a virtual meeting with a customer or even just remembering your coworker’s birthday.
With Microsoft Outlook, your coworkers, family, and friends will all be aware of your schedule without any further work on your side. Simply follow the steps we outlined above to share your Outlook Calendar with individuals inside and outside of your company for either personal or professional reasons
FAQ
1. Can I share my Outlook calendar with people outside my organization?
Yes, you can share your Outlook calendar with people outside your organization, but your organization’s administrator must first enable external calendar sharing in the Microsoft 365 admin center. Plus, the level of detail the person sees depends on the permissions you give.
2. What are the different permission levels when sharing a calendar in Outlook?
You can allow others to only see free/busy times, see all event details, or even edit and manage events depending on your needs.
3. Can I stop sharing my Outlook calendar once I’ve shared it?
Yes. Just go to your calendar permissions settings, select the person you want to remove, and click Remove.
4. Is it possible to share only part of my Outlook calendar?
Not exactly. Outlook shares the whole calendar, but you can create a new calendar for specific events or categories and share that separately.
5. What’s the difference between sharing an Outlook calendar and publishing it?
Sharing an Outlook calendar lets you control who sees your calendar and what they can do. Publishing makes it available as a read-only link that anyone with the link can access.