Read the instructions or check out the video below to learn how to create and share a Public Folder Calendar with Outlook Desktop:
watch this video
How to Create and Share Public Folder Calendars
Outlook
Outlook
How to Create and Share Public Folder Calendars on Outlook Desktop
Creating the Public Folder Calendar
- Log in to Outlook Desktop.
- Click the ellipsis at the bottom of the left-hand navigation panel.
- Click Folder to switch to the Outlook Folder View. (See figure below.)

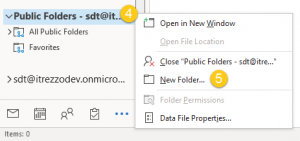
- Right-click Public Folders.
- Click New Folder. (See figure below). NOTE: You will need to be Owner or the Publishing Editor/Author of the parent folder to create new subfolders.

- Name the new folder. In this example, the new folder in this example is called Birthdays.
- Select Calendar Items under Folder contains.
- Select where to place the folder. In this example, the folder is placed in All Public Folders.
- Click OK. (See figure below.)

- Double-click the new subfolder in the left-hand navigation panel.
- Click New Appointment or New Meeting at the top-left corner of the window to start adding content to the folder.
Content goes here
Sharing the Public Folder Calendar
NOTE: You can only share a calendar to a mail-enabled account.
- Right-click the calendar you created in the Creating the Calendar section of this guide.
- Click Properties.
- Go to the Permissions Tab
- Click the Add button. (See figure below.)

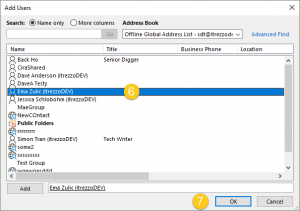
- Search for the user(s)/user group(s) you want to share the calendar with.
- Double-click on a name to add.
- Click OK. (See figure below.)

- Click the drop-down arrow in Permission Level.
- Choose the permission level to assign to the added user. In this example, the permission level will be changed to Editor.
- Click OK to share your calendar. (See figure below.)
 NOTE: You can only share a Public Folder Calendar to a mail-enabled account.NOTE:If you are an on-premise Exchange user, check out the itrezzo solution


