In this guide, we walk you through every way to create and share calendars in Outlook and Office 365 – from standard shared calendars and shared mailbox calendars to emailing a static copy or publishing a calendar to the web. We also cover meeting room and resource calendars, permission levels, and how to fix common errors like “This calendar can’t be shared,” so your team can schedule confidently. Finally, we show how CiraSync keeps all of these calendars synced to smartphones and devices automatically, so users always have the right schedule at their fingertips.
Key Takeaways:
- To create a shared calendar in Outlook for Windows, go to Calendar > Add Calendar > Name your calendar > Share Calendar > Enter email addresses.
- To create a shared calendar in Outlook mobile, go to Calendar, Add Calendar > Name your calendar > People icon > Share Calendar > Enter email addresses.
- To create a shared calendar in Outlook Web, go to Outlook.com and log in > Calendar > Add Calendar > Create blank calendar > Save > Share and permissions > Enter email addresses.
How to Create a Shared Calendar in Outlook for Windows
Whether you’re looking to coordinate meetings, plan group events, or keep everyone on the same page, a shared calendar in Outlook for Windows is invaluable.
Here’s how to create one:
1. Open the Microsoft Outlook application on your Windows computer.
2. On the bottom left side of the application, you’ll find the Calendar icon. Click on this to switch to the calendar view.
![]()
3. Select “Add Calendar” and then choose “New Calendar.”
4. Provide your calendar with a name, and you can also choose a specific folder if you wish.
5. Click “OK” to save.
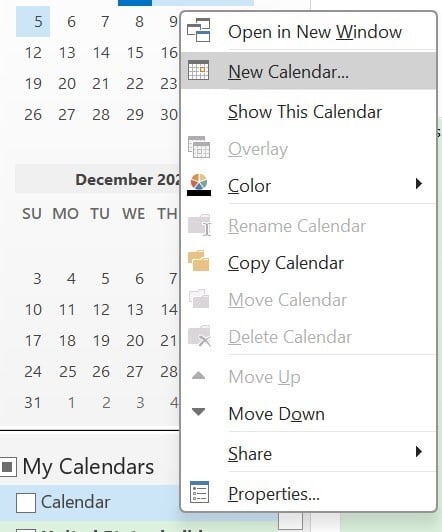
6. Share the Calendar. Sharing a Calendar is one of your organization’s best Outlook calendar tips.
- Right-click on the calendar you have just created under “My Calendars.”
- Choose ‘Share’ and then “Share Calendar.”
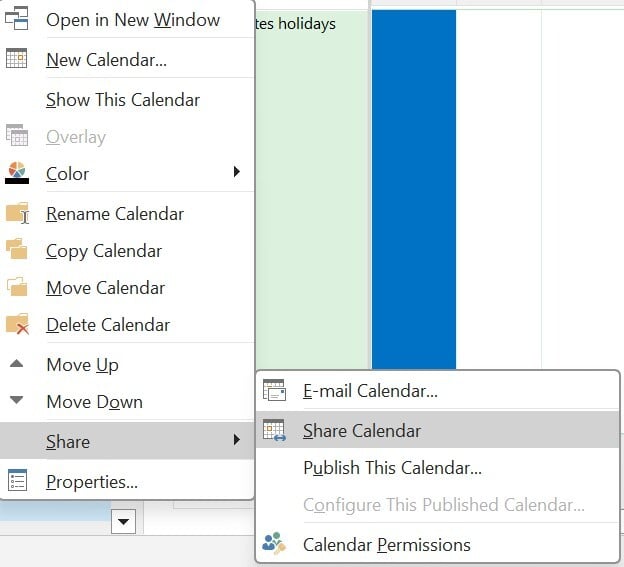
7. In the new window, enter the email addresses of the individuals you want to share the calendar with.

8. Decide the level of access each recipient will have. You can allow them to view, edit, or manage the shared calendar.
9. Click “Send.” An email invitation will be sent to the recipients.
Recommended reading: How to Add an Email Account to Microsoft Outlook?
How to create a Shared Outlook Calendar on Mobile
Sharing calendars isn’t limited to the desktop version of Outlook. You can also create and share calendars using the Outlook mobile app.
Here’s how:
- Open the Outlook app on your mobile device
- Tap the calendar icon at the bottom of the screen
- Tap the plus sign in the top right corner and select “Add Calendar.”
- Enter a name for your calendar
- Tap the “People” icon and type in the name(s) or enter the email addresses of the people you want to share your calendar with
- Tap the tick icon to share your calendar
How to create a Shared Calendar in Outlook Web
Outlook’s web version has since become the go-to tool for employees working from different locations, and setting it up is pretty straightforward.
Here’s how to set up shared calendars in Outlook’s web version:
1. In your web browser, go to Outlook.com or your organization’s unique Outlook web URL. Log in if it prompts you to provide one.
2. Click the calendar icon at the screen’s bottom left corner. It’s right below the mail icon. This takes you to the web calendar view.

3. Near the top of the page, click “Add Calendar” and select “Create Blank Calendar” from the dropdown menu. In the right panel, enter your new calendar’s name. You can also add a description and choose a color theme if desired. I like to color-code my calendars to make them easy to distinguish at a glance.
Click “Save,” and your new calendar will be created. It should be added to “My calendars” on the left sidebar.

4. To share your calendar, locate it on the left sidebar, click the three dots when you hover next to the calendar name, and choose “Sharing and permissions” from the menu.

5. Under “Share with,” enter the email addresses of the people you want to share the calendar with. As you enter addresses, Outlook will autocomplete from your contacts. After adding recipients, click the “Share” button to send them an invite email with access to the calendar.

I think the web version of Outlook makes it super simple to set up and share calendars on the fly from anywhere without needing the desktop app. The sharing process feels intuitive compared to other calendar tools I’ve used.
How to Create a Shared Calendar in Outlook for Mac
Creating shared calendars is simple on Mac computers.
Here’s how to do it:
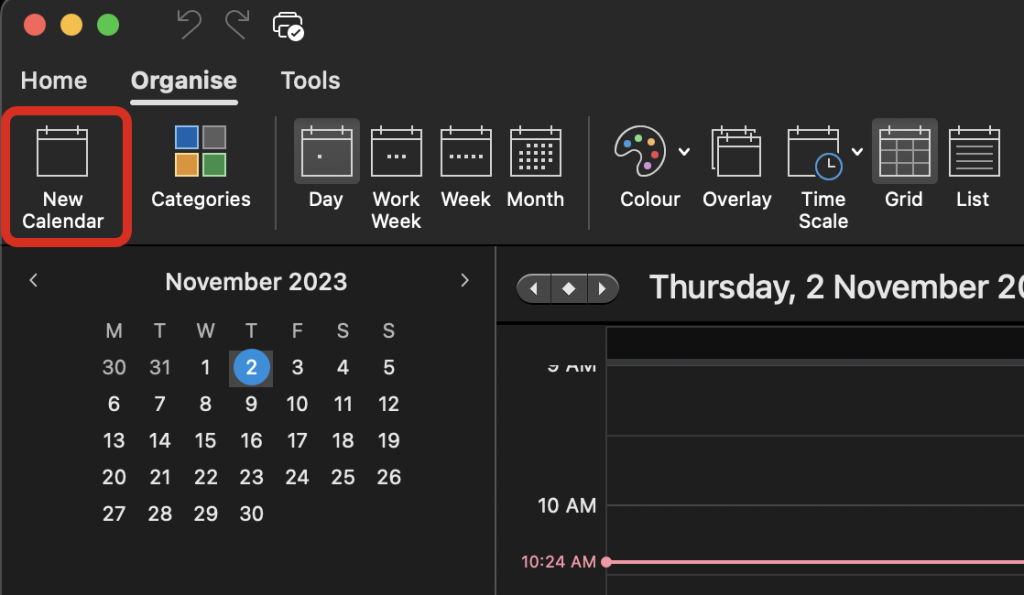
1. Launch the Outlook app on your Mac.
2. On the bottom toolbar, click on the calendar icon.
![]()
3. In the “Organize” tab, click “New Calendar.”
4. Enter a name for your calendar.
5. Drag and drop your new calendar to the desired location under “My Calendars” or leave it in its default spot.
6. Share Your Calendar:
- Right-click (or Control-click) the newly created calendar under “My Calendars.”
- Select “Sharing Permissions.”
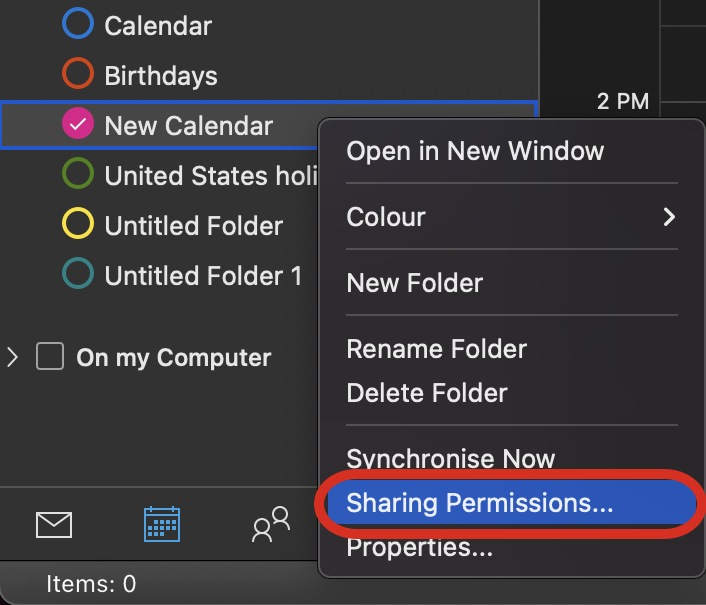
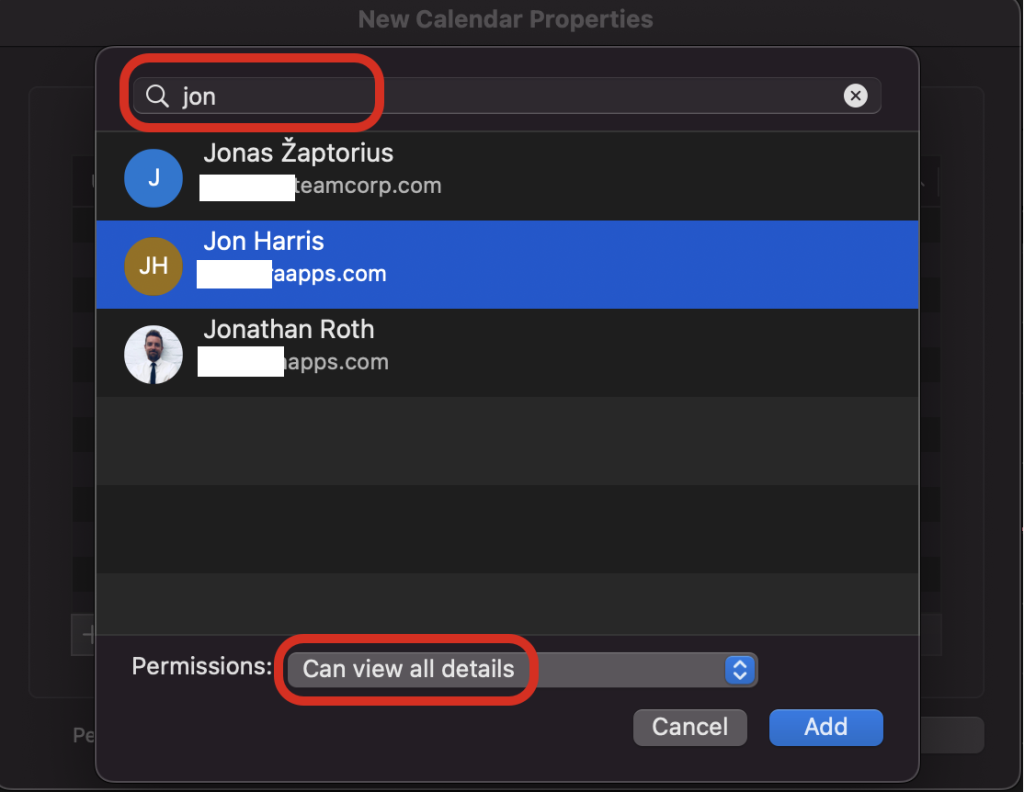
7. Click the ‘+’ button, then type and select the names or email addresses of the individuals you want to share the calendar with.
Note: You can specify the level of access each individual should have, from viewing all the way to editing.
8. Click “Add” and close the permissions window. Your recipients will receive an email notification granting them access.
Recommended reading: How to Create a Contact Group in Outlook?
How to Share a Calendar By Publishing It to a Web Page
If you want to share your calendar with people outside your organization or those who might not have an Outlook account, you can publish it to a web page.
Here’s how to do it:
1. Open Outlook on your computer and go to the Calendar view.
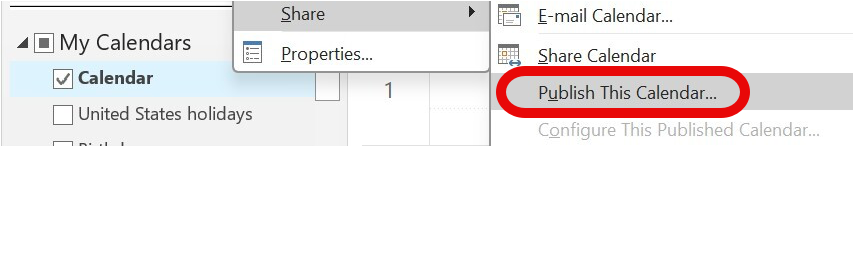
2. In the navigation pane, right-click on the calendar you wish to share.
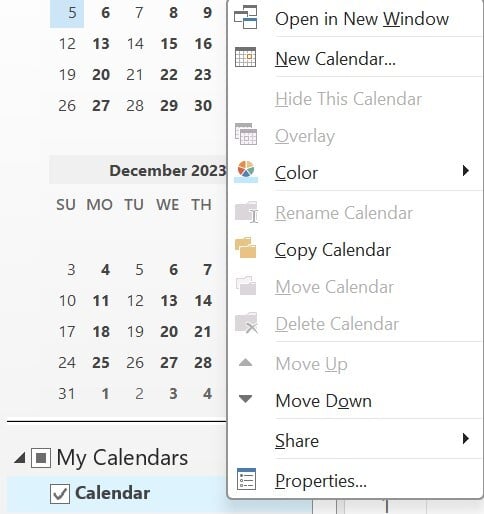
3. Choose “Publish to Web” or “Publish This Calendar.”
4. From the drop-down list, select the desired detail level. You can choose from can view when I’m busy, can view titles and locations, can view all details.
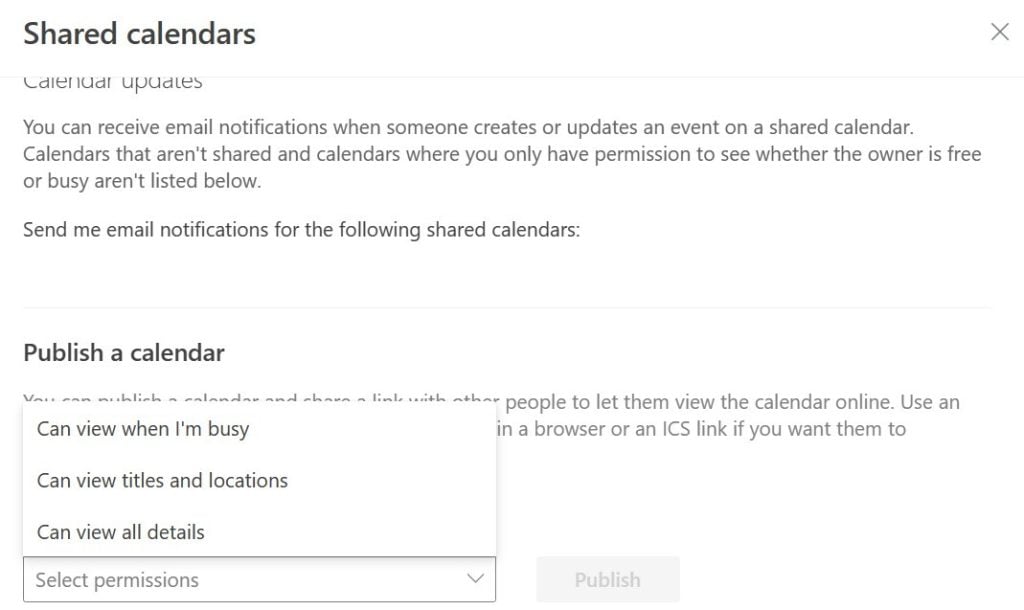
5. Click Publish.
6. Outlook will create a URL for your calendar. You can share this link with anyone you wish to give access to.
Different Permission Levels When Sharing a Calendar in Outlook
When sharing a calendar, it’s essential to consider what level of access each person needs. As the calendar owner, you can choose the appropriate permission for each person based on their role and needs.
Outlook offers the following permission levels for calendar sharing:
- Can view when I am busy: This basic level only displays when you have events scheduled on your calendar. No other details, like the subject or location of the events, are visible to the person with this permission.
- Can view titles and locations: With this permission, the person can see the times of your events and the subject and location for each one. However, they still can’t access any additional details you may have included in the event description.
- Can view all details: As the name suggests, this level allows the person to see all the information about your calendar events, including the time, subject, location, and any other details you’ve added. However, they cannot make any changes to your calendar.
- Can edit: This permission level allows the person to modify your calendar directly. They can create, edit, and delete events and view all the details of existing items. This level is appropriate for close collaborators or assistants.
- Delegate: The highest level of access, Delegate permission allows the person to manage your calendar as if it were their own. They can edit events, view full details, and even send and respond to meeting requests on your behalf. This level is typically reserved for executive assistants or other trusted individuals.
How to Share a Static, View-Only Copy of Your Outlook Calendar (via Email)
You can share a calendar as a static, view-only copy through Outlook Online. If you want to keep a calendar group private, you can choose to share only your main mail calendar. Follow these steps.
Step 1: Open the calendar and click “E-mail Calendar”
Open Outlook and choose the calendar you want to share. Select E-mail Calendar from the menu.
Step 2: Select the calendar and the date range
Outlook will ask you to choose which calendar you want to send and for what time period. Pick the date range you want others to see.
Step 3: Add the recipients and send
Enter the recipients in the To field and send the message.
They will receive a view-only version of the calendar and an iCalendar (.ics) file they can download. The file opens in Outlook or any calendar app that supports the format.
How to Create a Shared Calendar in a Shared Mailbox in Outlook
Creating a shared calendar in a shared mailbox lets multiple users access the same calendar without receiving invitations. Everyone who has access to the shared mailbox can open the calendar automatically. You do not need to send invites or grant extra permissions.
Step 1: Create a new blank calendar
Open Outlook and click Add Calendar. Choose New Blank Calendar.
Step 2: Add the calendar details and choose the mailbox location
Enter the calendar name and any details. In the Where to Place the Folder section, select the shared mailbox.
Step 3: Save the calendar
Save your changes. Everyone who has access to the shared mailbox will now see this calendar when they open Outlook.
How to Access a Shared Calendar in Outlook and See Events
Once someone has shared a calendar with you, you must add it to your Outlook to view it. Here’s how to access a shared calendar and see its events:
- In Outlook, go to your calendar view
- Right-click “My Calendars” in the folder pane on the left
- Select “Add Calendar” and then “Open Shared Calendar.”
- Type the name or email address of the person whose calendar you want to add
- Their calendar will now show up alongside your own, and you’ll see their events
Why Can’t I Create a Shared Calendar In Outlook?
The following are potential reasons for problems with creating a shared calendar in Outlook:
- Permissions: The most common reason is a lack of permissions. You may not have the necessary rights to create or share calendars, especially if you’re part of a larger organization with IT-imposed restrictions.
- Outdated Software: If you’re using an older version of Outlook, some features may not be available or may have known issues. Always ensure Outlook is up-to-date.
- Server Issues: If you’re using Outlook in an enterprise setting, there might be server-side issues or policies that prevent sharing calendars.
- Configuration Problems: There could be misconfigurations in your Outlook settings or issues integrating Outlook with other software or services.
- Connectivity: If you are facing issues with your internet connection, it might hinder the process.
If you still have issues after using the above tips, contact your IT department or refer to Microsoft’s official help documentation for detailed troubleshooting.
Fixing the “This calendar can’t be shared” error
If you see the “This calendar can’t be shared” message, it usually happens for one of these reasons:
- The email address is invalid
Check the address and type it correctly to fix the issue. - The email address belongs to a Microsoft 365 Group
Outlook will not send a calendar invite to a Microsoft 365 Group, so the share request will fail. - The email address belongs to someone outside your organization
Make sure the recipient is part of your organization. External users cannot receive the shared calendar in this case.
What is the Difference Between a Shared Calendar and a Group Calendar in Outlook?
A Shared Calendar is created by an individual and shared with specific people. The original owner can decide the level of access each person has – from view-only to edit rights. On the other hand, a Group Calendar is associated with a Microsoft 365 Group or Microsoft Teams. Users of that group or team have access to the group calendar. Members can add or modify events depending on permissions set by the group admin.
Check out this post to learn how to create a Group Calendar in Outlook.
Group calendars are great for teams where all members must collaborate on scheduling and events. Shared calendars are Ideal for scenarios where only a selected group of individuals needs access.
The Bottomline
Outlook offers a suite of tools for calendar sharing and collaboration. Whether using Outlook on Windows, Mac, or the Web, the platform provides a user-friendly way to create and share calendars. Following the steps above, you can effectively coordinate schedules, plans, and events with your colleagues, family, or friends. Remember to set permissions judiciously, ensuring recipients have the appropriate level of access.
Frequently Asked Questions
A shared calendar is created by an individual and shared with others. The calendar owner can control the permissions. On the other hand, a group calendar belongs to an Outlook group rather than an individual. All group members have equal access to view and modify events. Group calendars are great for teams who manage their schedule collectively.
How do I add a shared calendar in New Outlook?
Here is how to add a shared calendar in New Outlook:
1. In the Calendar view, click “Add Calendar” above the calendar list.
2. Select “From directory” to add a calendar shared by someone in your organization.
3. Search for a person’s name or email and select their calendar.
4. Click “Add,” and the shared calendar will appear in your calendar list.
How to add an Internet calendar from outside your organization?
Here is how to add an Internet calendar from outside your organization in 3 steps:
1. Click “Add calendar” then “From Internet.”
2. Paste the ICS link to the calendar and click “Add.”
3. Enter a name for the calendar and click “Save.”
The shared calendar should now appear under “Other calendars.”
How to create a shared calendar in the Outlook 365 admin center
To create a shared calendar in the Microsoft 365 admin center, create a shared mailbox, which includes a shared calendar, or create a resource calendar for a room or equipment. For a shared mailbox, go to Admin > Users & Groups > Shared Mailboxes, add a new mailbox, and add members
Create a Microsoft 365 group (or use an existing one) for your department. Outlook automatically gives all group members access to the group calendar, so you do not need to share it, user by user.
calendar permissions to many users or groups at once. After that, users only need to add the calendar in Outlook.
Usually no. Standard distribution lists or listservs do not work reliably for calendar permissions. Use a Microsoft 365 group or a mail-enabled security group and share the calendar with that group instead.
Add everyone to a Microsoft 365 group or mail-enabled security group and share the calendar with that group using a view-only permission level, such as can view all details or Reviewer.
Yes. An Exchange or Microsoft 365 admin can use PowerShell (for example, Add-MailboxFolderPermission) to assign calendar permissions to many users or groups at once. After that, users only need to add the calendar in Outlook.
Related Posts: