An Outlook contact group, sometimes called a distribution list, is a collection of email addresses you can use to send an email to many recipients at the same time. This feature is essential when you frequently send emails to the same group of people, such as teammates, a group of friends, or members of a club or organization. But how do you create a contact group in Outlook? Let’s show you the steps for Windows, Mac, and Web. Keep reading! Key takeaways:
- To create a contact group in Outlook for Windows, launch Outlook > People > Home > New Contact Group > Name your group > Add contacts.
- To create a contact group in Outlook for Mac, open Outlook > People > Home > New Contact List > Name your contact list > Add contacts > Save & Close.
- To send an email to an Outlook contact group, compose your email > Type the contact group name in the ‘to’ field > Send
TL;DR – How to Create a Contact Group in Microsoft Outlook
What it is: A Contact Group (aka Distribution List) lets you email multiple people at once using a single group name. Not to be confused with Microsoft 365 Groups, which include shared inboxes and calendars.
How to create it:
| Platform | Path |
| Windows | Outlook → People → Home → New Contact Group → Name it → Add Members → Save & Close |
| Mac | Outlook → People → Home → New Contact List → Name it → Add members (+) → Save & Close |
| Web | Outlook.com → People → New contact dropdown → New contact list → Name it → Add emails → Create |
How to use it: Compose an email → type the group name in the To field → Send.
How to manage it: Add/remove members by opening the group and using the Add/Remove buttons. Edit names or delete the group from the same contact view.
Pro tips: Use descriptive names, categorize groups, keep them updated, and use Bcc to hide member emails for privacy.
Troubleshooting: If emails aren’t delivered, check for typos, mail filters, large member counts, or sync issues across devices. Contact Groups don’t appear in mobile Outlook.
What is a Contact Group in Outlook?
A Contact Group, also known as a Contact List or Distribution List, lets you email many people at once by using a single group name. Outlook also includes Microsoft 365 Groups, which are different from Contact Groups. A Microsoft 365 Group has a shared inbox, calendar, and collaboration space, while a Contact Group is only used for sending emails.
How to Create a Contact Group in Outlook for Windows
1. Launch the Microsoft Outlook application on your Windows computer. 2. Click on the “People” icon located at the bottom left corner of the Outlook window. ![]() 3. On the Home tab, in the “New” group, click on “New Contact Group.”
3. On the Home tab, in the “New” group, click on “New Contact Group.” 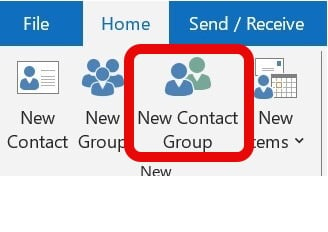 4. A dialog box will appear. Enter a name for your contact group in the “Name” field.
  5. Click “Add Members” and choose where to add contacts. Add contacts from your Outlook contacts, address book or a new email contact.
 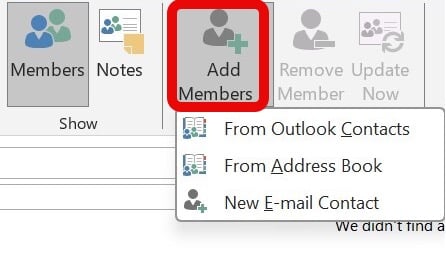 5. Highlight the contacts you want to add to the group and click the “Members” button.
  7. Once you’ve added all the desired contacts, click “OK.” 8. Click “Save & Close” to create the contact group. Recommended reading: How to View the Global Address List in Outlook?
How to Create a Contact Group or Contact List in Outlook for Mac
1. Open the Microsoft Outlook application on your Mac. 2. Click the “People” icon in the bottom left corner. ![]() 3. On the Home tab, click “New Contact List.”
3. On the Home tab, click “New Contact List.” 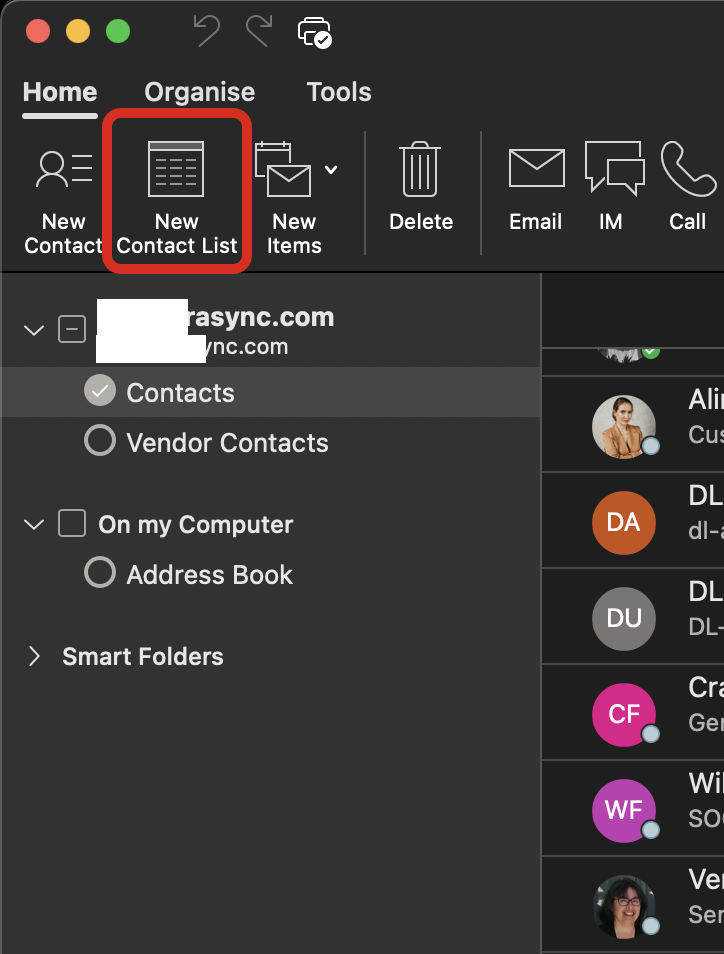 4. Enter a suitable name for your contact list. 5. Click the “+” sign to add members to the list. You can search for contacts or directly add email addresses.
 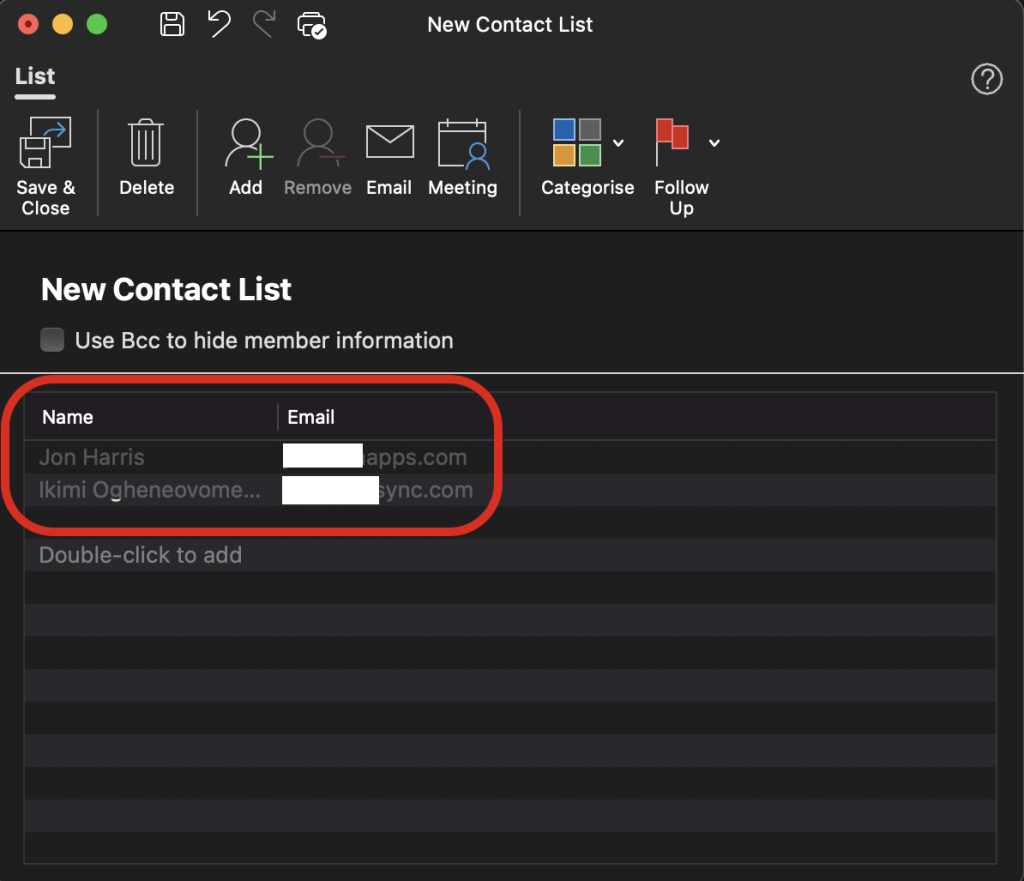 6. Once you have added all the members, click “Save & Close.”
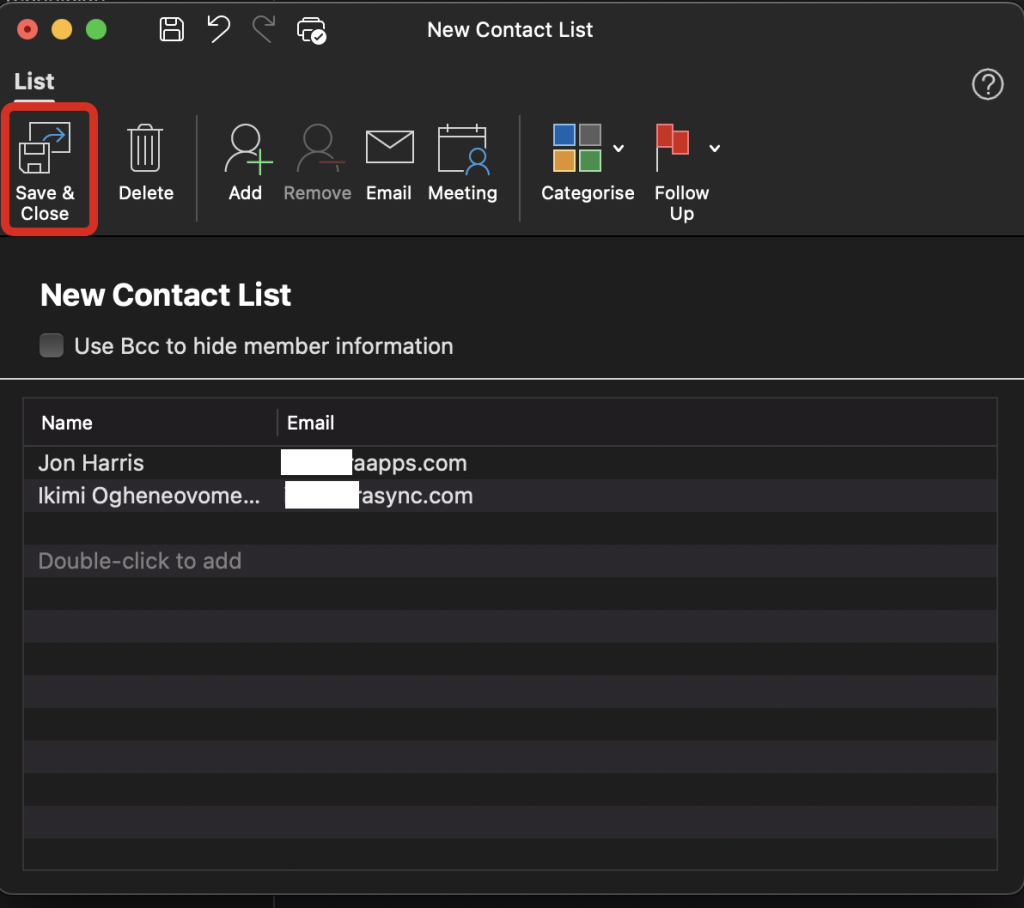
How to Create a Contact Group in Outlook Online
1. Visit the Outlook website and sign in to your account. 2. Click the “People” icon in the bottom left corner. ![]() 3. On the “New contact” dropdown list, click “New contact list.”
3. On the “New contact” dropdown list, click “New contact list.” 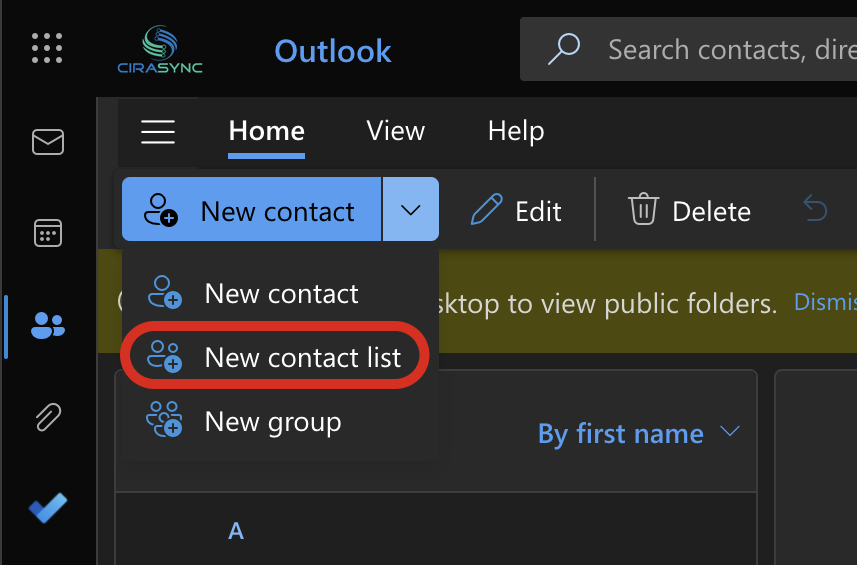 4. Add a name to your contact list and add members by typing names or email addresses.
  5. Once you’ve added all the desired members, click “Create.”
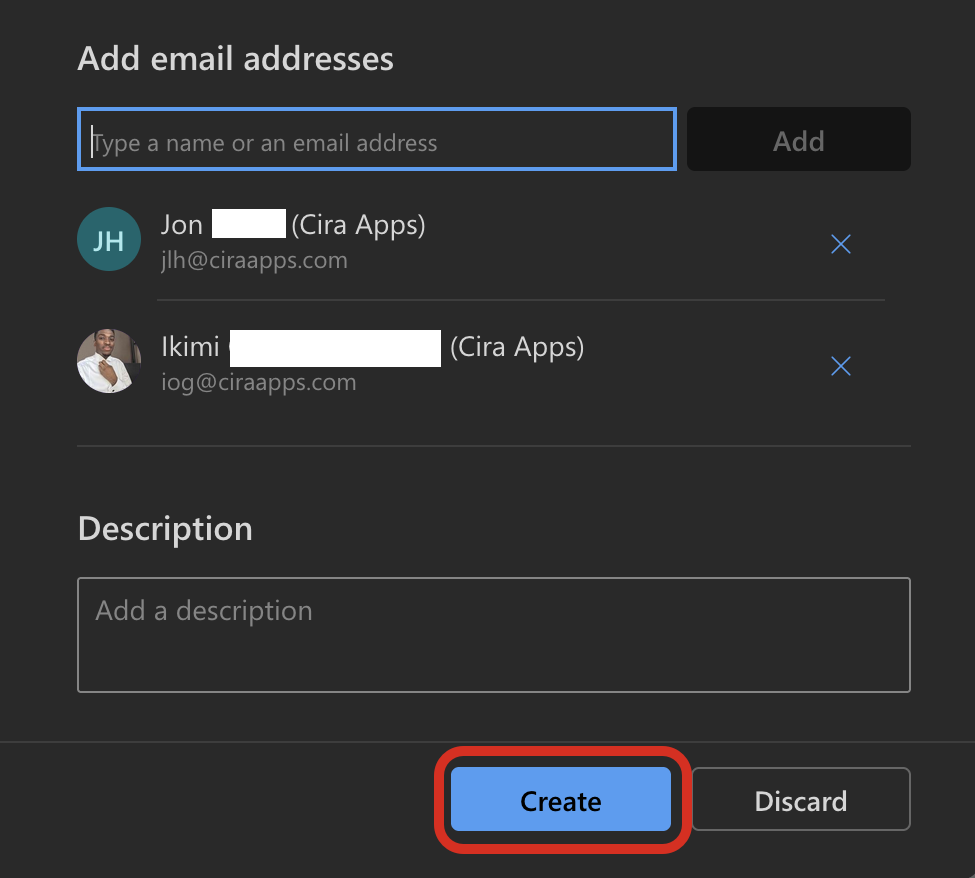
Send an Email to an Outlook Contact Group
- Start by composing a new email in Outlook for Windows, Mac, or Online.
- In the “To” field, type the contact group name you created. Outlook will auto-suggest the group name. Click on it to add it to the recipients.
- Compose your email as you normally would and click “Send.”
Recommended reading: How to Add Gmail to Outlook?
Finding Your Contacts in the Outlook App.
Knowing where to find your contacts in the Outlook app is always essential. Follow the steps below to find them:
- Launch the Outlook application on your computer.
- Navigate to the Bottom Left Corner. Here, you’ll see several icons, including Mail, Calendar, and People (or Contacts in some versions).
- Click on the “People” or “Contacts” icon. Once you’re in the Contacts section, you’ll see a list of all your saved contacts on the main screen.
Now that you know where to find your contacts, let’s move on to editing a contact group.
How to Add or Remove Members From a Contact Group
Keeping group lists current prevents bounced emails and confusion. Below are clear, platform-specific steps to add members to an Outlook Contact Group and to remove members from a Contact Group in Outlook. Each subsection shows the fastest path and useful tips for bulk edits and troubleshooting.
Outlook for Windows (desktop)
Add members to the Outlook Contact Group
- Open Outlook and go to the People or Contacts view.
- Double-click the Contact Group you want to update.
- Click Add Members on the ribbon, then choose:
- From Outlook Contacts to pick from your address book.
- From the Address Book if you use an Exchange/365 directory.
- New E-mail Contact to type a name and email not already in your contacts.
- Select contacts or type addresses, then click OK.
- Click Save & Close to apply changes.
Remove members from the Contact Group Outlook
- Open the Contact Group in People or Contacts view.
- Select the contact you want to remove.
- Click Remove Member on the ribbon or press the Delete key.
- Click Save & Close.
Quick tips
- To add many contacts at once, hold Ctrl while selecting multiple entries before clicking OK.
- To create a group from an email thread, drag the sender names from the message header into a new Contact Group window.
- If you use the new Outlook interface, menu names may differ slightly but the Add and Remove actions remain.
Outlook for Mac
Add members to the Outlook Contact Group
- Open Outlook and go to the People tab.
- Double-click the contact list you want to edit.
- Click Edit or the pencil icon.
- Click Add or the plus icon and choose contacts from your list or enter a new email address.
- Click Save.
Remove members from the Contact Group Outlook
- Open the contact list and choose Edit.
- Click the small remove or minus icon next to the contact name.
- Click Save.
Quick tips
- Mac lets you copy and paste multiple email addresses into the add field. Paste them separated by commas and press Enter.
- If a contact comes from Exchange, changes sync back to the server. If not, edits stay local to your Mac profile.
Outlook on the web (Outlook.com and Office 365)
Add members to the Outlook Contact Group
- Sign in at outlook.office.com and click the People icon in the left column.
- Open the contact list you want to change.
- Click Edit contact list or the edit icon.
- Use Add members to search contacts or type new email addresses.
- Click Save.
Remove members from the Contact Group Outlook
- Open the contact list, click Edit contact list.
- Click the X or remove button next to the person to delete them from the group.
- Click Save.
Quick tips
- The web client syncs instantly with Exchange and Microsoft 365 accounts.
- For Outlook.com free accounts, some features may look different, but Add and Remove remain available.
Bulk add, import, and advanced methods
- Import from CSV: Export a CSV of emails from another app, import those contacts into Outlook contacts, then add them to a group using multi-select and Add Members.
- Create a new group from selected contacts: Select multiple contacts in People view, right-click, and choose Create Contact Group from Selection where available.
- Use Directory/Global Address: For business accounts, add users directly from the Global Address List to ensure proper email routing.
Sync, permissions, and common issues
- If members do not appear across devices, check that you are signed into the same Microsoft account and that contact sync is enabled.
- Removing a member from a group removes them only from that group. It does not delete the contact from your address book.
- Large groups may hit sending limits set by your Exchange or mail provider. If emails fail, split the list or use a mailing tool.
- If group edits revert, verify whether your account uses server-side groups managed by an administrator. Admin-managed groups require admin changes.
How to Edit a Contact Group in Outlook
Editing a contact group in Outlook is straightforward. Follow the steps below:
- Locate the contact group you wish to edit. Click on it to select it.
- Double-click on the contact group’s name. This action will open a new window displaying the group’s details.
- Edit Group Name:
If you wish to change the name of the group, click on the name field at the top and make your desired changes.
- Add or Remove Members:
To add members, click the “Add Members” button in the toolbar at the top. You can choose contacts from your address book or type new email addresses. Select the member’s name from the list to remove members and click the “Remove Member” button.
- Once you’ve made all the necessary changes, click the “Save & Close” button to save your edits.
How to Delete a Contact Group or List in Outlook?
You can delete a particular contact group if you no longer need one. Below is how:
- Locate and click on the contact group you wish to delete.
- Right-click on the contact group’s name. A dropdown menu will appear. Select “Delete Group” from the options.
- A confirmation window might pop up, asking if you’re sure about deleting the group. Click “Yes” to confirm.
- The contact group should no longer appear in your list of contacts. Try refreshing the page or restarting the Outlook application if it’s still there.
Recommended reading: How to Create Outlook Contact Folders?
Create a contact list in new Outlook for Windows:
- Open new Outlook and select People in the left sidebar.
- Select the arrow next to New contact, then choose New contact list. (In new Outlook, “contact groups” are called “contact lists.”)
- Enter a name for the list.
- In Add members, type names or email addresses and select matches from your contacts or organization directory.
- Select Create. Because new Outlook and Outlook on the web share the same contacts, the list appears in both automatically.
Tips for Organizing and Using Contact Groups in Outlook Effectively
Contact Groups can significantly streamline email communication. However, like any tool, its effectiveness depends on how it’s used. But how can you maximize the benefits? Let’s delve into some strategies.
1. Categorize Your Contact Groups
Categorize your contact groups based on their purpose. For instance, you might have categories like “Work Projects,” “Software Engineers Group,” etc. Doing this lets you quickly identify and select the right group when sending emails. For larger organizations or extensive networks, consider sub-categorizing your groups. For example, under the main category “Work,” you might have sub-groups like “HR Department,” “Sales Team,” and “Tech Support.”
2. Use Descriptive Names
When naming your contact groups, be descriptive. Instead of generic names like “Group 1” or “Team A,” use names that immediately tell you who’s in the group, such as “Marketing Team” or “Family Group.”
3. Use Contact Groups for Professional and Personal Communication
For professional communication, you can create a contact group for separate project teams if you’re working on multiple projects. This way, you can quickly update everyone involved without missing out on anyone. For example, you can create a group called “Departmental Updates” for managers and team leads, which would be useful for sending departmental updates, meeting invites, or important announcements. If you frequently communicate with a set of clients, you may want to create a contact group for them. This can be especially useful for sending newsletters, updates, or promotional offers. For personal communication, such as family and friends, you can create separate groups for family, extended family, college friends, gym buddies, etc. This makes sending out invites for gatherings, sharing updates, or circulating information easier. If you’re part of clubs or interest-based groups, such as a book club, hiking group, or music band, contact groups can also help keep everyone in the loop.
4. Keep Contact Groups Updated
Set aside time to review and update your contact groups, perhaps once a month. Add new members, remove those no longer relevant, and update email addresses when necessary. Encourage feedback from group members. If someone prefers not to be in a particular group or if their email address changes, they should feel comfortable letting you know.
Troubleshooting Common Issues
Users often encounter issues with Contact Groups, which can disrupt communication flow and lead to inefficiencies. The following are some of the most common issues:
1. Group Members Not Receiving Emails
One of the most common issues with Contact Groups is that some members do not receive the emails sent to the group. This can be due to various reasons:
- Incorrect Email Addresses:
Ensure all email addresses in the group are correct. A single wrong email address can prevent the entire group from receiving emails. To fix this, open the Contact Group and review each member’s email address. Correct any typos or inaccuracies.
- Spam Filters:
Sometimes, emails sent to Contact Groups might be flagged as spam by the recipient’s email client. You can ask your group members to check their spam or junk folders. If they find the email there, they should mark it as “Not Spam” to prevent future emails from being flagged.
- Email Sending Limits:
Outlook has a limit on the number of recipients you can send an email to at once. Some members may not receive the email if your Contact Group exceeds this limit. One workaround for this problem is splitting Contact Groups into smaller groups or sending emails in batches.
2. Contact Group Missing or Deleted
Another common issue is the accidental deletion or loss of a Contact Group. This can be distressing, especially if the group contains many members. The following are some tips for resolving this problem:
- Check Deleted Items Folder:
When a Contact Group is deleted, it’s moved to the Deleted Items folder in Outlook. Open the “Deleted Items” folder and search for the missing Contact Group. If found, right-click on it and select “Move” > “Other Folder” > “Contacts” to restore it.
- Recreate the Group:
If you can’t find the Contact Group in the Deleted Items folder, you might need to recreate it. To fix this, simply go to the Contacts section in Outlook and create a new Contact Group. Add the members manually or import them if you have a backup.
3. Group not syncing across devices
If your Contact Group is not syncing across Outlook for desktop, web, or mobile, check that contact syncing is enabled in account settings and that all devices use the same Microsoft 365 or Exchange account. Local contact groups created in a PST file or on one device do not sync automatically across platforms.
Fixes
- Enable contact sync in Outlook mobile settings
- Convert local PST contacts to Exchange or Microsoft 365 contacts
- Restart Outlook to refresh address book updates
4. Contact Group missing in mobile Outlook
Contact Groups may not appear in mobile Outlook because the app does not fully support Contact List editing. You can view and use groups only if they sync from Exchange or Microsoft 365, but you cannot create or edit groups in the mobile app.
Fixes
- Open Outlook on desktop or the web to manage groups
- Confirm your account type supports Contact Lists (POP/IMAP accounts often do not)
- Update the mobile app to the latest version
5. Recipients not receiving group email due to large member count or mail filters
If recipients do not receive emails sent to a Contact Group, the message may have exceeded the provider’s sending limits or triggered spam filtering. The issue often appears with large groups or when many external addresses are included.
Fixes
- Send the message using Bcc to reduce spam scoring
- Divide the Contact Group into smaller lists if it exceeds your provider limit
- Ask recipients to check spam or whitelist your email domain
- For businesses, contact your IT admin to review sending restrictions
If your Outlook Contact Group is not sending emails, verify your send limits and try Bcc formatting.
6. Using Bcc to protect contact privacy
When sending to a Contact Group, all member email addresses appear in the message header unless Bcc is used. This can create privacy risks, especially in mixed external and internal lists.
Fixes
- Enter the Contact Group in the Bcc field instead of To or Cc
- Put your own email address in the To line for a cleaner presentation
- For large public sending needs, use a mail merge or mailing service instead of Contact Groups
Quick troubleshooting checklist
- Check account type: Exchange and Microsoft 365 sync best across all devices
- Verify you are in People or Contacts view if Contact Groups appear missing
- Confirm sending limits if messages fail or bounce
- Use Bcc for privacy and spam-filter protection
- Restart Outlook to rebuild the address cache
In conclusion
Creating a contact group in Outlook is a straightforward process that can save you a lot of time when you need to regularly send emails to the same group of people. Whether you’re using Outlook on Windows, Mac, or online, the above steps are intuitive and easy to follow. Related Articles:
- How to Create a Shared Calendar in Outlook?
- How to Share an Outlook Calendar?
- How to Change the Default Address Book in Outlook?
- Microsoft Outlook Calendar: Best Tips and Tricks!
- How to Create Appointments and Meetings in Outlook?
Frequently Asked Questions
- Why can I not find Contact Groups in Outlook?
You may not find Contact Groups in Outlook if you are using the mobile app (which has limited editing support), an account type that does not support Contact Lists (such as POP/IMAP), or if you are not in the People/Contacts view. In the New Outlook for Windows, go to the People icon in the left sidebar, click the New contact dropdown, and select New contact list to create a group. If you are using Classic Outlook, ensure you are in People view and look for New Contact Group on the Home ribbon. - What is the limit of Contact Group members in Outlook?
The limit of Contact Group members in Outlook depends on your mail provider, but most Microsoft 365 and Exchange accounts support about 500 to 1,000 members per Contact Group before send limits apply. - Can I create a Contact Group from an email message?
Yes, you can create a Contact Group from an email message by opening the message, selecting addresses in the header, and adding them to a new Contact Group in Outlook. - Why can’t I see or use Contact Groups in Outlook after switching to the “New Outlook”?
The New Outlook for Windows supports Contact Lists (contact groups). To create or manage one, go to People → click the New contact dropdown → select New contact list. The interface is the same as Outlook on the web. If you cannot see existing groups, ensure contact sync is enabled and that you are signed into the same Microsoft 365 or Exchange account across devices. - My Contact Group shows only email addresses, not names. Why?
This may happen if Outlook failed to load full contact details for some members; sometimes adding a new contact shows only the address, not the saved contact name. - I pressed “Send” after selecting a Contact Group, but the email never went out. What’s wrong?
This is a known glitch when using Contact Groups in some Outlook environments; expanding the group (using the “+” beside it) then re-sending often resolves the issue. - Why is a Contact Group from someone else’s mailbox not visible to me, even after they shared it?
Shared Contact Groups require proper permissions and sync settings to appear across accounts. Ensure both sender and receiver are using the same account type (Microsoft 365 or Exchange) and that contact sync is enabled. If the issue persists, verify permissions in the Classic Outlook desktop app or ask the sender to re-share the group with the correct access level. - Why can’t I find Contact Groups in the new Outlook?
If you don’t see the option, confirm you’re using a supported Outlook version and account type. Microsoft 365 and Exchange accounts provide the best support for contact lists, while functionality may vary with POP/IMAP accounts. - Which Outlook am I using?
If you see a “New Outlook” toggle in the top-right corner, you’re in new Outlook (use “contact list”); switch it off for classic Outlook (use “contact group”). Microsoft is moving Microsoft 365 users to new Outlook through 2026.